Do you have any questions? Write to info@numiron.sk

Numiron support

Numiron Support & FAQ

Group 957 (1)
Settings

Personal tax return

home

Getting Started

pie-chart-analysis

Views

Frame 7718

Invoicing

bar-chart-analysis

Cost

Frame 7715

Finance

user

Settings

percent-badge

Data

user

Subscription

Frame 7718

Integrations

Contact us if you haven't found the answer

Mon - Fri from 08:00 - 16:00

Setting up your own e-mail (SMTP) server in Numiron

If you want to send invoices and other documents from your own address (e.g. faktury@vasafirma.sk), set up your own SMTP server in Numiron. Below you will find the complete procedure.

Gmail

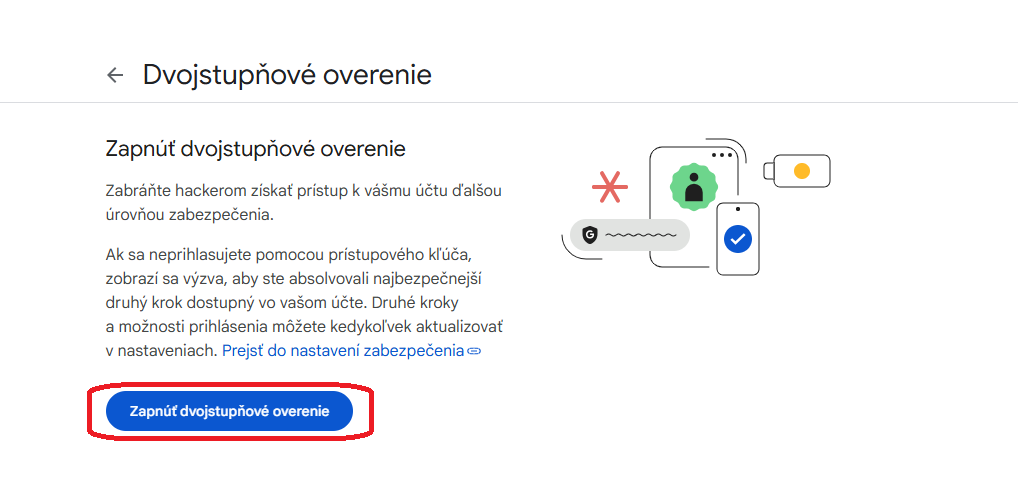
1. Enable two-factor authentication

Log in to your Google account and go to Security.

In the section How do you sign in to Google you will find an option to enable two-factor authentication (2FA). Activate it.

google 2fa
2. Generate a password for the application After enabling two-factor authentication, generate a password for the application:
Open this link: https://myaccount.google.com/apppasswords and log in to your account if the system prompts you to do so.

Enter „Numiron“ in the application name field and click Create.
app pasword vytvorit

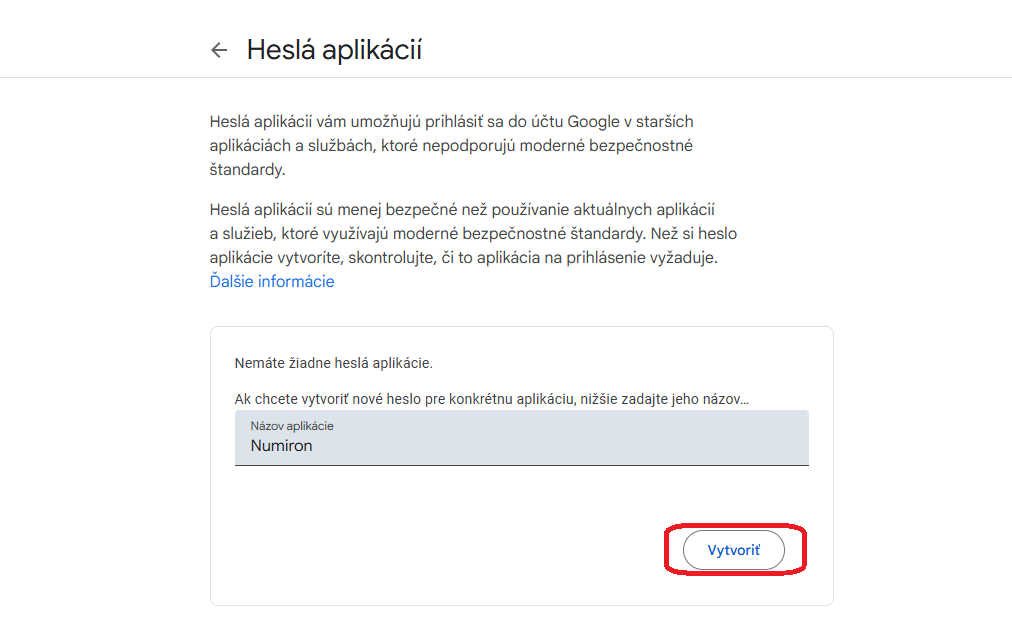
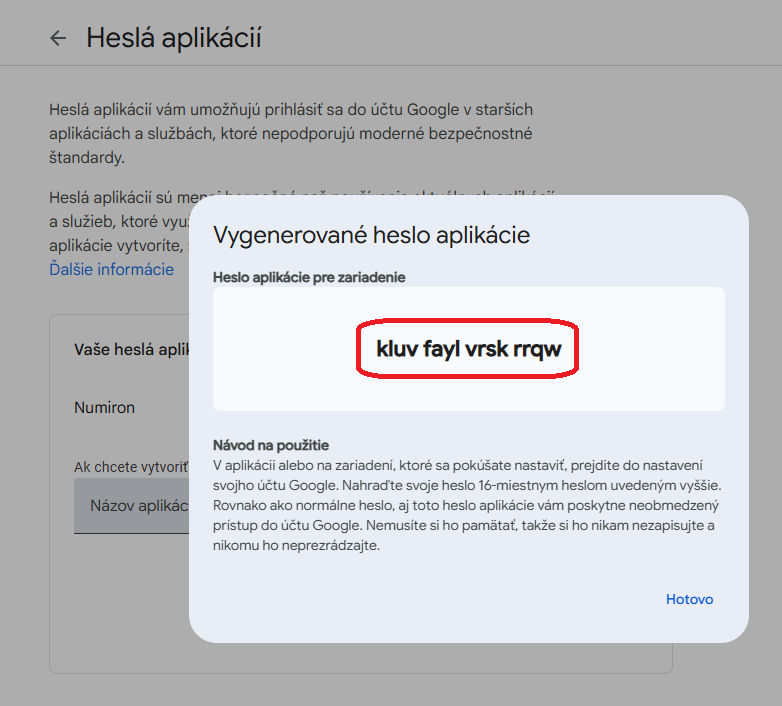
Then copy the generated password - you will need it in the next step.

app pasword

3. Setting up email in Numiron

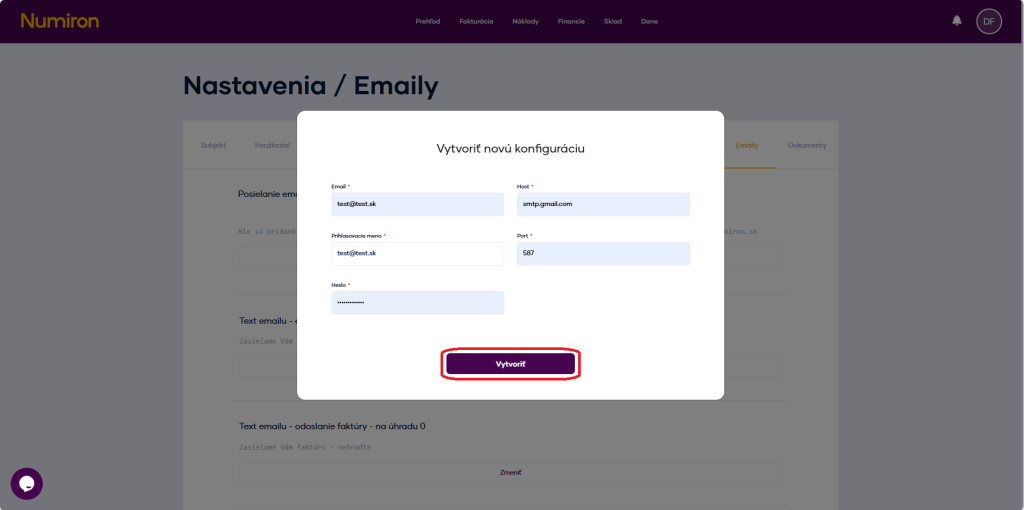
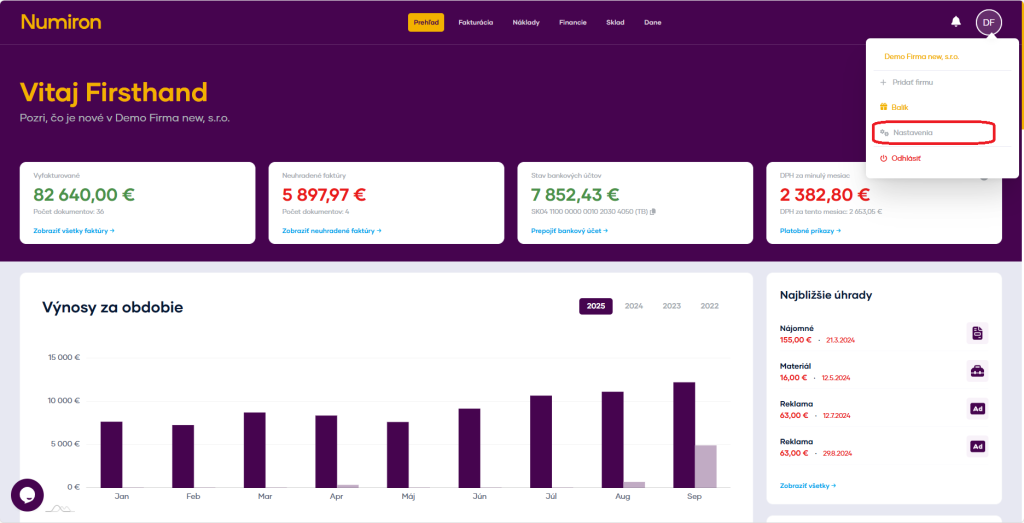
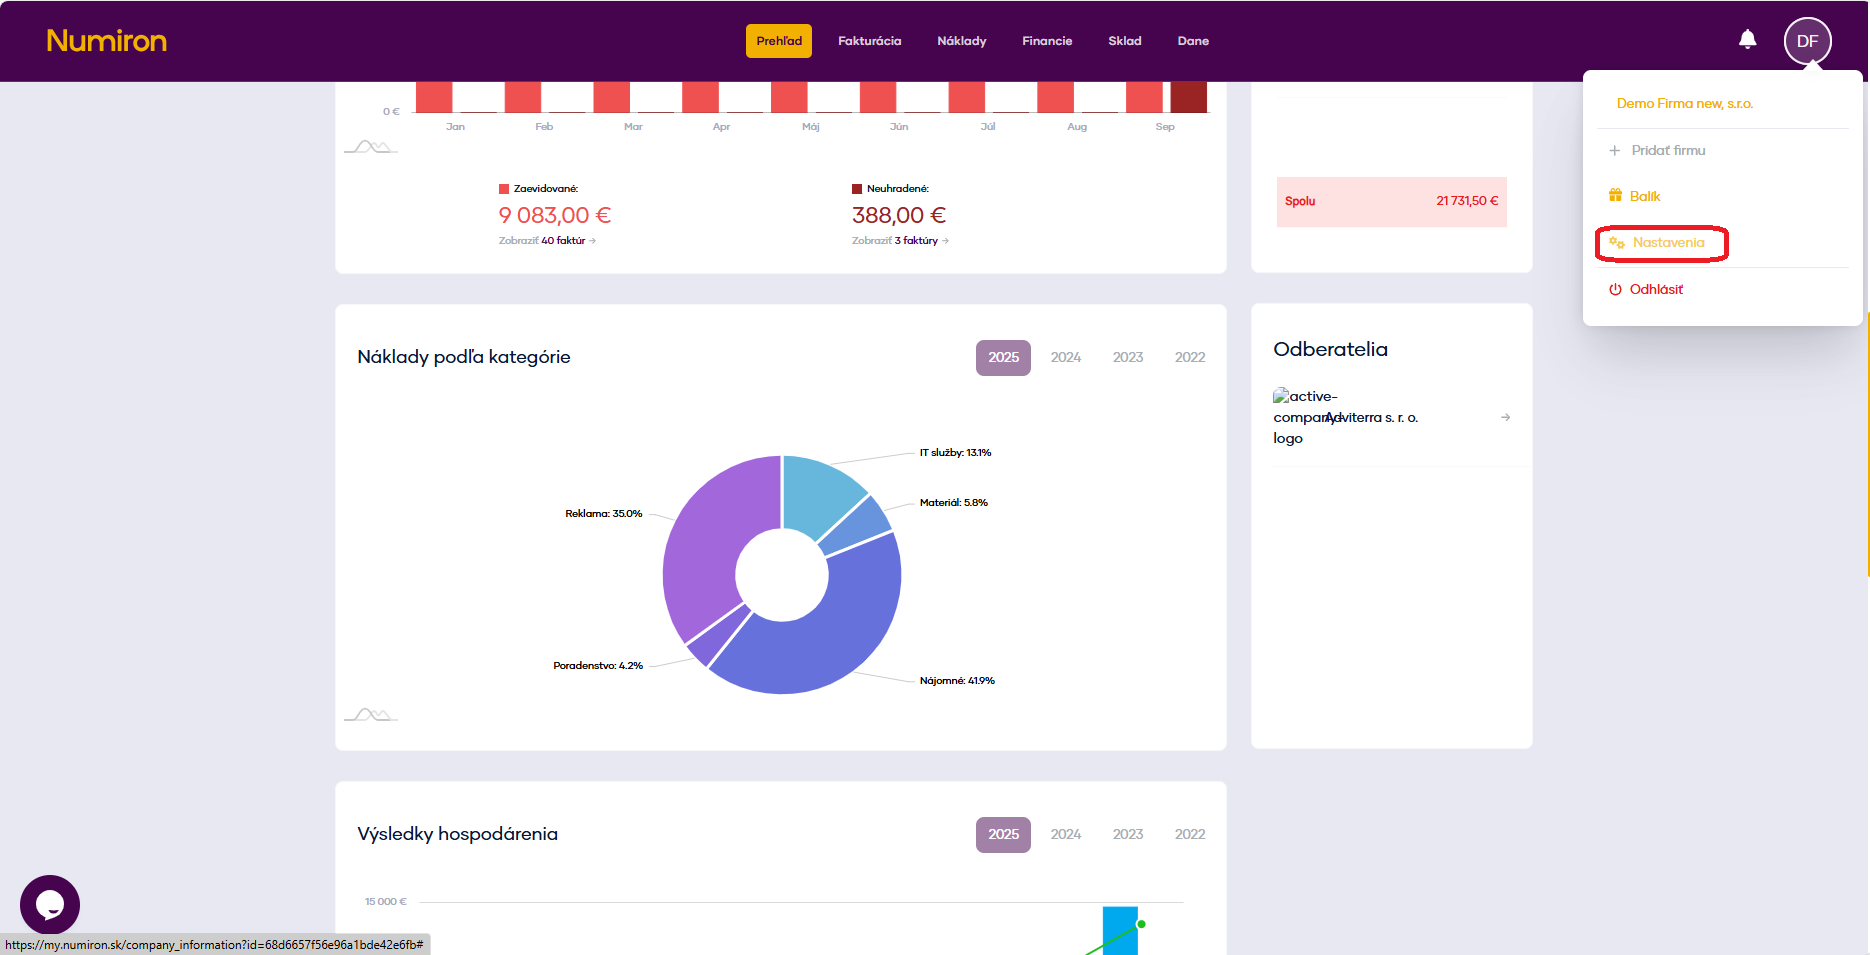
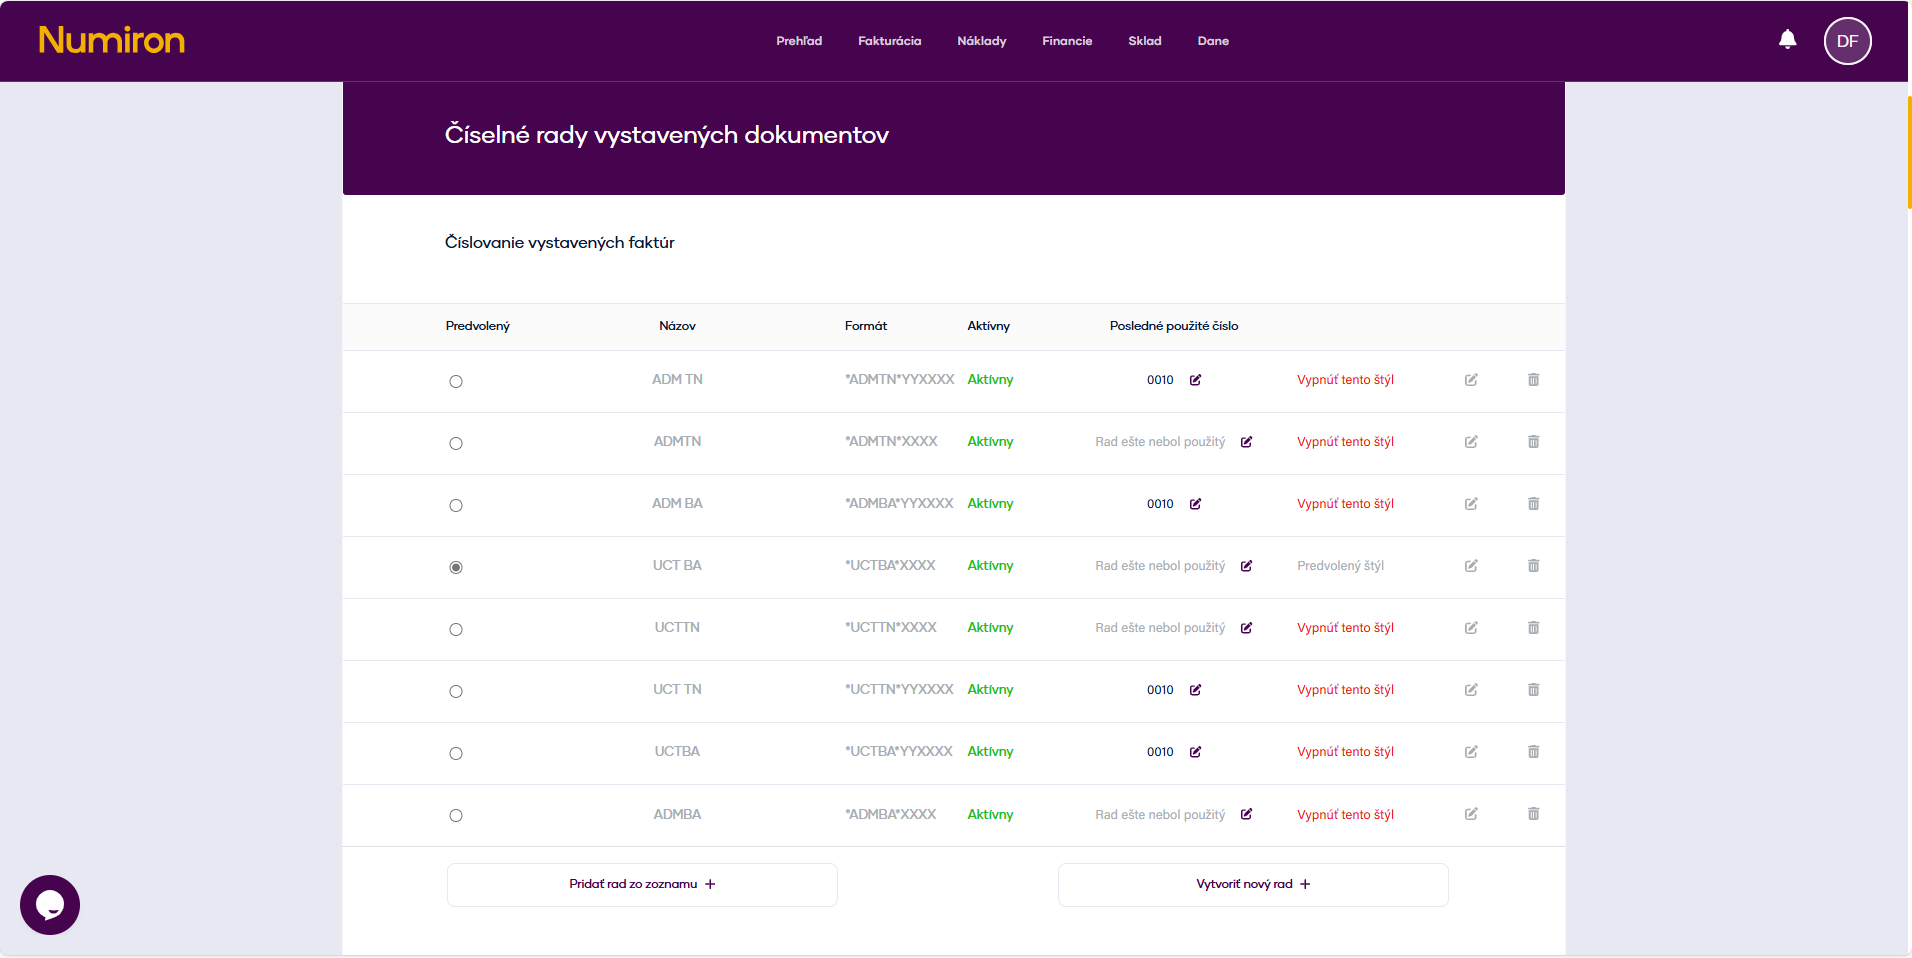
In the top right corner, click on your profile icon and select Settings and switch to the section Emails.

prehlad nastavenia new

Subsequently, in the section Sending emails via your own server click Add.

mail pridat

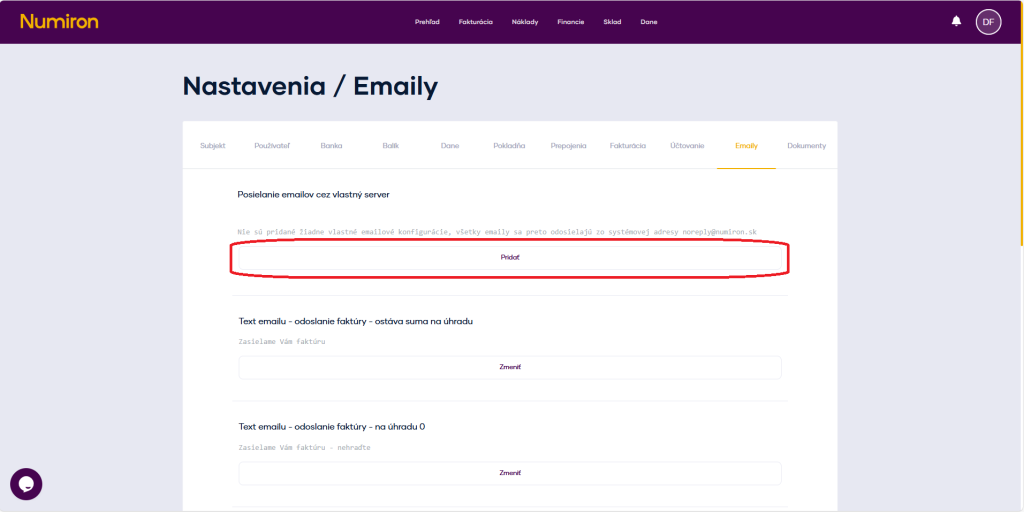
Fill in the following details:

Email: your email account (e.g. vasemail@gmail.com),

  • login name: the same email as above,
  • Guest: smtp.gmail.com,
  • port: 587,
  • password: enter the generated password for the application,
  • click on Create.
email vytvorit

First settings in Numiron - invoice appearance, contact details

Before issuing the first invoice, we recommend setting up all the basic information about your company and customizing the appearance of your documents. This will ensure your invoices contain the correct information and look professional. 

1. Where can I find these settings 

Click on the subject icon in the top right corner. Then in the drop-down menu, click on Settings section will open Entity.  

prehlad nastavenia new

2. General data 

Check the general data:

  • company name
  • ID, VAT, VAT NUMBER,
  • Headquarters (street, municipality, postcode, country),
  • Phone, e-mail, web,
  •  if you need to change, please contact us at info@numiron.sk
subjekt zakladne udaje

3. Contact details 

Contact details will automatically appear on your invoices and other documents. 

  • phone number 
  • contact e-mail 
  • websitea

After editing, click on Save

subjekt kontaktne udaje

2. Appearance and branding of invoices 

Open Settings, in section Entity scroll down the page to the section Visual presentation

Click on each zone to upload an image: 

  • logo,
  • icon,
  • Signature of documents.
subjekt logo

Choose from the default color combinations (main color + complementary color), or write your own color code. 

subjekt farby

Accounting in Numiron - Default settings

In this section you can set global defaults for all new documents, or choose to use the data stored directly for a specific customer or supplier for invoices and expenses. 

1. To open the default settings 

In the top right corner, click on the icon of your Profile, Select Settings and switch to the section Accounting. 

prehlad nastavenia new

2. Configure presets 

You have two options for each of the items: 

Rad - will be used automatically for all new documents. 

Client - The data stored directly at subscriber level shall be used.  

klient rad

Available fields: 

  • Centre - text field + selection from list,
  • order - text field + selection from list, 
  • activity - text field + selection from list, 
  • type of delivery - drop-down list, 
  • currency - drop-down list, 
  • document language - drop-down list, 
  • constant symbol - text field, 
  • default description - text field, 
  • send delivery note - Yes/No switch. 

3. Saving changes 

Once you have set all the items, remember to click on Save, to activate the preferences for all new documents. 

ulozit

How to generate IBANs to pay your taxes

If you are a self-employed person, an individual or an entrepreneur, you will need a so-called "tax remittance" to pay your taxes. OUD (Personal Taxpayer Account). Based on this, Numiron will automatically generate specific IBANs for each type of tax so that you always use the correct account when making payments. 

1. Open tax settings 

In the top right corner, click on the icon of your Profile, Select Settings and switch to the section Data 

prehlad nastavenia

2. Inserting the OUD 

The IBAN/OUD field is located at the top. This is where you enter your OUD number. 

oud numiron

If you don't already have one, generate OUD on the portal of the Financial Administration  

Verification of... - PFS 

oud financna sprava

3. Regeneration of IBANs 

After adding the OUD, click on Regenerate IBANs. Numiron creates specific accounts for each type of tax (e.g. VAT, income tax, levies) and assigns them to the appropriate categories.

pregenerovat ibany

4. Use of IBANs when creating payment orders 

When you create tax payment order, the correct IBAN will be automatically filled in according to the tax type you have selected. You no longer need to search for it or copy it from external sources - everything is ready for you directly in the system. 

platobny prikaz dani vytvorit

Accounting in Numiron - centres, contracts, activities and business focus

Numiron allows you to divide your documents by centres, contracts, activities and business focus (SK NACE). This gives you a better overview of your income and expenses, and makes it easier to manage reports and accounting documents. 

1. Activation of zoning 

In the top right corner, click on the icon of your Profile, Select Settings and switch to the section Accounting. 
 

prehlad nastavenia new

In the section Resorts click on Add

strediska pridať

Enter title centres (e.g. „Marketing“, „Service“). 

Select color, in which the resort is displayed in the graphs. 

Press Add
 

strediska vytvorit

Activate and create in the same way: Contracts (projects, clients) and activities (e.g. „Advice“, „Installation“).

Once saved, these fields will appear whenever you create an invoice, freight or cash receipt, where you can assign the appropriate centre, order or activity.  

stredisko pouzit

2. Filling in the business focus (SK NACE) 

These settings are mainly used for FO tax returns. 

In the top right corner, click on the icon of your Profile, select Settings and switch to the section Accounting. Then scroll down to the section Business focus. 

prehlad nastavenia new

In the field, search and select the correct EN NACE code (e.g. 62010 - Computer Programming). 

Then specify the main category of income according to your business and optionally add an accounting note (e.g. main activity of the company). Confirm the changes by clicking on Save

sknace

How to set up your own number series in Numiron

The numbering series determines how your documents are automatically numbered. You can set them up by year, document type or operation so that you have a clear numbering system. 

1. Opening the number series settings 

In the top right corner, click on the icon of your Profile, Select Settings and switch to the section Billing.  

prehlad nastavenia new

Then scroll down to the section corresponding to the documents for which you want to set the number series. 

  • numerical series of issued documents
  • numerical series of documents received 
  • numerical cashier board 
ciselne rady

2. Create a new number series 

In the corresponding section, click on Create a new queue

ciselne rady vytvorit

In the form enter: 

Series name (e.g. „Invoices 2025“). 

Number format

You can insert static prefixes (e.g. 2025/FA/) and tokens: 

  • {YYYYY} - year 
  • {MM} - month 
  • {NNN} - sequential number with three digits 
ciselne rady prefixy

(Optional) Set the default values for this queue:

  • type of delivery
  • constant symbol
  • default centre, contract, activity
  • menu (currency),
  • Description (introductory sentence of the invoice), 
  • document language ,
  • whether to add a delivery note as a compulsory annex document.

This option appears when you click on the icon Pera in the right part of the number series record.

ciselne rady volitelne nastavenia

Click on Create.  

ciselne rady vytvorit final

3. Adjustment or removal of the series 

In the list of number series, click on Pen for modification or for Basket for removal. 

ciselne rady uprava

Editing can be done at any time, but changes will only be applied when new documents are created (existing documents will remain unchanged). 

How to fix a number series after deleting a document in Numiron

If you delete an invoice or other document, the number series may skip one number. To make the next document follow up correctly, just edit the number series in the settings.

1. Check the last valid number 

In the top right corner, click on the icon of your Profile, Select Settings and switch to the section Billing.  

prehlad nastavenia new

 
Then scroll down to the section corresponding to the documents for which you want to correct the number series. 

ciselne rady posledne cislo

2. Modification of the „Last used number“ 

Click on the icon Pen for a specific number series.  
 

ciselne rady uprava pero

In the field Last used number enter number Before the deleted document (e.g. 0009) and press Save

ciselne rady uprava uložiť

How to change your password

If you need to update your login password, you can do it quickly in your profile. 

1. Open User Settings 

Click on your profile icon in the top right corner a Select Settings

prehlad nastavenia new

Switch to section User and scroll down to the Change password

2. Change password 

Fill in the fields Old password, New password 

Click on Change password

zmena hesla

How to set up two-factor authentication (2FA)

Two-step verification is an easy way to increase the security of your account. In addition to your password, you'll also confirm access with a one-time code from a mobile app like Google Authenticator, Authy or Microsoft Authenticator when you log in. 

1. Open User Settings 

In the top right corner, click on the icon of your Profile and select Settings

prehlad nastavenia new

Switch to section User and scroll down to the Two-step verification

2fa

2. How to activate 2FA 

Click Activate next to the Two-Step Verification. 

2fa aktivovat

The screen will display QR code a secret code (or „seed“). 

In 2FA (Google Authenticator, Authy, Microsoft Authenticator): 

Select Add account and then scan the QR code or select manual entry and enter the secret code. 

2fa qr kod

The app will generate a six-digit authentication code, which you enter into the field in Numiron and click Activate. 

2fa aktivovat button

3. How 2FA login works 

The next time you log in, you will first enter your normal login details (email and password). 

Numiron then prompts for a 2FA code - open the app and enter the actual six-digit code. 

2fa prihlasenie

4. Why it's worth switching on 2FA 

Account security - even if the password is leaked, no one can log in without a 2FA code. 

Easy to use - just scan the QR code and use the short codes from the app. 

Flexibility - works with all common 2FA applications. 

Setting roles and managing subject members

1. Adding a new member 

Click on the subject icon in the top right corner. Then in the drop-down menu, click on Settings section will open Entity. Scroll down to the members section. 

prehlad nastavenia new

 In the Email field, enter the address of the person you want to invite and click Add a member

pridat clena

Then select a role: 

  • Invoice - issues and adjusts invoices. 
  • Invoice+ - In addition, it has access to receipts and payments. 
  • The Economist - manages expenses, bank imports and cash registers. 
  • Admin - Full access, including settings and user management. 

The system automatically sends an invitation to the specified e-mail address. After accepting it and registering, the new member will be added to your account. It is necessary to create an account in the system to the same e-mail address to which the invitation was sent. 

clenovia nastavenie role

2. Modification or cancellation of membership 

In the section Members you can see an overview of all invited and active users. 
Click on the current role to reassign the member to another role. 

clen editacia

To cancel access completely, click on by his name. 

clen odstranenie